Patches Lanyards and Really Tricky Perforamce Fabrics!
Hello Everybody…
I hope your 2015 has started out with a bang! Here at the “Q” things are moving right along and the year is off to a great start. For all of our friends up in the North East we hope you will see a spring thaw starting in the next couple of weeks. I grew up in Buffalo, New York so please believe me when I say understand what you are going through. The only difference is, when I went through it I was a kid and we would wake to huddle around the radio (yes, radio) and listen for those magic words, “Snow Day” at our schools. The kids would whoop and scream with joy and the parents would sigh and cringe!
About 4 years ago the number one product our customers asked us to add to our product set was embroidered emblems. So, in the spring of 2011 we started manufacturing and selling what I feel are some of the highest quality and competitively priced custom patches you can find on the internet. All of us at Qdigitizing/Qemblem would like to thank you for making this division such a success for us. We have produced 10’s of thousands of patches over the past 4 years and look forward to continued growth.
The second most requested product was custom Lanyards. It has taken us some time to find a vendor who meets are rigorous quality and service standards but in January we added custom lanyards to our product set. We invite you to go to www.qemblem.com and click on the lanyard tab to check out our full selection of custom lanyards. We have made getting a quote super easy and we hope you will take advantage of our excellent product, service and prices for all of your custom lanyard needs. If you have any questions please call customer service at 877-733-4390 and ask for me. I will be happy to answer all of your questions about custom lanyards.As we move in to 2015 one area of custom embroidery continues to be a challenge for many of us; embroidering on Performance Knits. One of the first blogs I ever wrote was a suggestion for how to work embroider on this challenging material. Below is a reprint of that article. I am doing this because we get multiple daily requests for tips on how to embroider on this fabric. Before I share this article though let me state this, not all designs will embroider well on all performance knit fabrics. I will stake my reputation on this. Some designs are simply too stitch intensive to work well on some of these fabrics. Unfortunately it is impossible to know which designs will cause problems on what fabrics because each design and each fabric is different. However, designs that are “fill stitch intense” are going to cause the mot problem. The most important thing to take away from the conversation is to understand that success is very much on a case by case basis. If you have questions on a particular design and fabric I welcome you to give me a call so we can discuss your concerns.
Working With Performance Fabrics
I would like to tackle one of the trickiest substrates to present itself in many years; Performance Moisture Wicking Fabrics. These products come in many different brands, styles, weights and fabric properties but one characteristic that remains constant is these fabrics tend to have a great deal of stretch.
Additionally these fabrics stretch in all directions; this makes for particularly challenging embroidery and success is dependent on quality digitizing for a programmer who knows what they are doing as well as superior embroidery technique.
The technique I will describe takes extra time for garment prep but is proven to work on a production floor with more than 600 embroidery heads embroidering over 4 million garments a year. If you want to save some money on redcuing damaged product and lost productivity give this a try; it is not the only way…but when properly implemented it will work.
The Most important thing to remember is your embroidery backing is used to stabilize and reduce the stretch inherent to performance fabrics. Proper backing with quality digitizing and the spray adhesive technique will allow for superior results.
1. Make sure your digitizer is 100% aware they are programming for performance fabric. This is CRITICAL.
2. Use a high quality 3.5oz or heavier cut-away backing.
3. Obtain KK-100 Fabric Adhesive.
4. Turn your garment inside out.
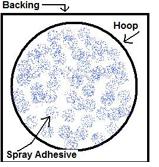
5. Very lightly spray the center portion of your backing with the
KK-100 and then apply the backing to the fabric to the location on the inside of the shirt where the embroidery will go taking care to NOT stretch the material and making sure there are no wrinkles or puckers in the area under the backing. If you get any pooling of adhesive on the backing you have used too much. Discard and create a new piece.

6. Avoid getting adhesive where hoop will press into shirt.
7. Turn shirt right side out and hoop as normal. Make sure 100% of the backing is captured by hoop so there is even fabric tension across the entire hooped location.
8. Under no circumstance should you over tighten the hoop. Never use a wrench or screwdriver to tighten the hoop. Fabric should be taught but not stretched.
9. Embroider as usual on slightly reduced speed.
As usual, if you have any issues you would like me (Cora or Amy) please call or email me and I will make sure that we address your question in our blogs or if your question requires a personal response we will out to you personally.
Thank you for everything and all of us at Qdigitizing.com hope to hear from you soon.
Thank you,
Steve Freeman
steve.freeman@qdigitizing.com
877-733-4390