Embroidery on Performance Knit Fabrics.
Greetings Everyone………
It is finally, officially cooling off in Phoenix and that means we are turning the corner to a busy holiday season. When we get busy that means you guys get busy. And when you get busy it means you don’t want to waste time re-stitching garments where the embroidery did not work the way you hoped it would. Much of this blog is a re-post from my very first message public post but the topic is still incredibly relevant and is probably (still) the most frequent production related question I receive. That question is, “I am working with moisture wicking, stretchy, performance knit polyester fabric and the embroidery does not look good. How can I fix this?”
This blog is going to focus on the practical aspects of that question but before we get in to that let me say this; it is vitally critical you let your programmer know your intent to be stitching on performance fabrics. Not all designs are friendly to these products no matter what we do and for designs that will work we (the digitizer) must use special techniques to help ensure your success. Furthermore, designs programmed for performance knits may or may not work well on other fabric substrate. It is strongly recommend that before you use a design programmed for performance knit on any other type of fabric you run a sample on that fabric before committing to a production run on and making a very expensive mistake.
Performance Knits are perhaps the trickiest substrates to present in many years. These products come in many different brands, styles, weights and fabric properties but one characteristic that remains constant is these fabrics stretch in all directions. This makes for particularly challenging embroidery (like sewing on a rubber band) and success depends on quality digitizing from a programmer who knows what they are doing as well as superior embroidery technique from a machine operator.
The technique I describe takes extra time for garment prep but is proven to work on a production floor with more than 600 embroidery heads producing more than 4 million garments a year. If you want to save some money by reducing damaged product and lost productivity give this a try; it is not the only way…but when properly implemented it is one method that can work.
The most important thing to remember is that embroidery backing you used is used meant to stabilize and reduce the stretch inherent to performance fabrics. Proper backing with quality digitizing and the spray adhesive technique described will allow for superior results.
Note: since this blog was originally published “sticky backings” are available through several different suppliers and can be substituted for the “spray adhesive” technique shown below. However, those backings are a lot more expensive than using this technique with your favorite, quality backing.
For the superior results please follow these 10 steps:
1. Make sure your digitizer is 100% aware they are programming for performance fabric. This is CRITICAL.
2. Use a high quality 3.5oz or heavier cut-away backing.
3. Obtain KK-100 (or similar) fabric adhesive.
4. Turn your garment inside out.
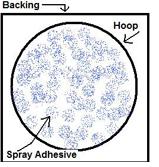
5. Lightly spray the center portion of your backing with the KK-100 and then apply the backing to the fabric to the location on the inside of the shirt where the embroidery will go taking care to NOT stretch the material and making sure there are no wrinkles or puckers in the area under the backing. If you get any pooling of adhesive on the backing you have used too much. Discard and create a new piece.

6. Avoid getting adhesive where hoop will press into shirt.
7. Turn shirt right side out and hoop as normal. Make sure 100% of the backing is captured by hoop so there is even fabric tension across the entire hooped location.
8. Under no circumstance should you over tighten the hoop. Never use a wrench or screwdriver to tighten the hoop. Fabric should be taught but not stretched.
9. Only hoop the fabric tight enough to firmly hold the fabric. At all costs avoid over stretching the material as you press the inner hoop into the out hoop. It is impossible to avoid stretching a little (there are physics involved here) but you can and should minimize as much as possible. If you have overstretched the fabric when you release the hoop the fabric will snap back to its original size with the result being puckering. It takes practice, experience and “touch” to get this right but you need to get a feel for what is too tight and what is too loose.
10. Embroider as usual on slightly reduced speed.
That’s it for now. If you have any questions regarding commercial embroidery or digitizing please do not hesitate to drop me a line here or send an email to steve.freeman@qdigitizing.com.
Thank you,
Steve Freeman
Qdigitizing.com
877-733-4390